

.png)


.png)


Step 1: Connect the terminal to the power adapter and fully charge it before use. This ensures it's ready to go when you start setting it up.

_1745311084_WNo_1600d900.webp)
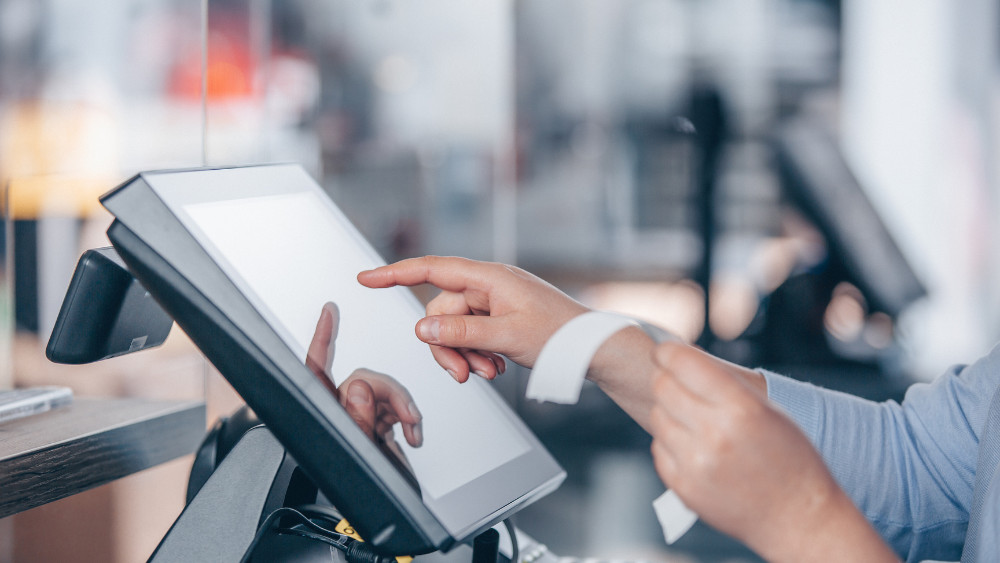
Imagine a scenario where you can effortlessly set up your terminal in minutes, connect it to printers and scanners without hassle, and customize its interface to match your brand’s unique workflow. Picture the convenience of accepting multiple payment methods—from credit cards to mobile wallets—with just a few taps, while also gaining real-time insights into sales trends and inventory levels. Whether you run a bustling retail store, a cozy café, or a mobile pop-up shop, this guide is designed to help you harness the full potential of your Android POS terminal and Android POS System, no matter your technical expertise.
In the following pages, we’ll walk you through every step—from unboxing and initial setup to advanced features like security configurations and custom workflows. You’ll learn how to troubleshoot common issues, integrate hardware peripherals, and even tailor the terminal’s appearance to reflect your brand. By the end, you’ll not only understand how to use your terminal with confidence but also discover how it can drive growth, improve accuracy, and elevate the way you do business.
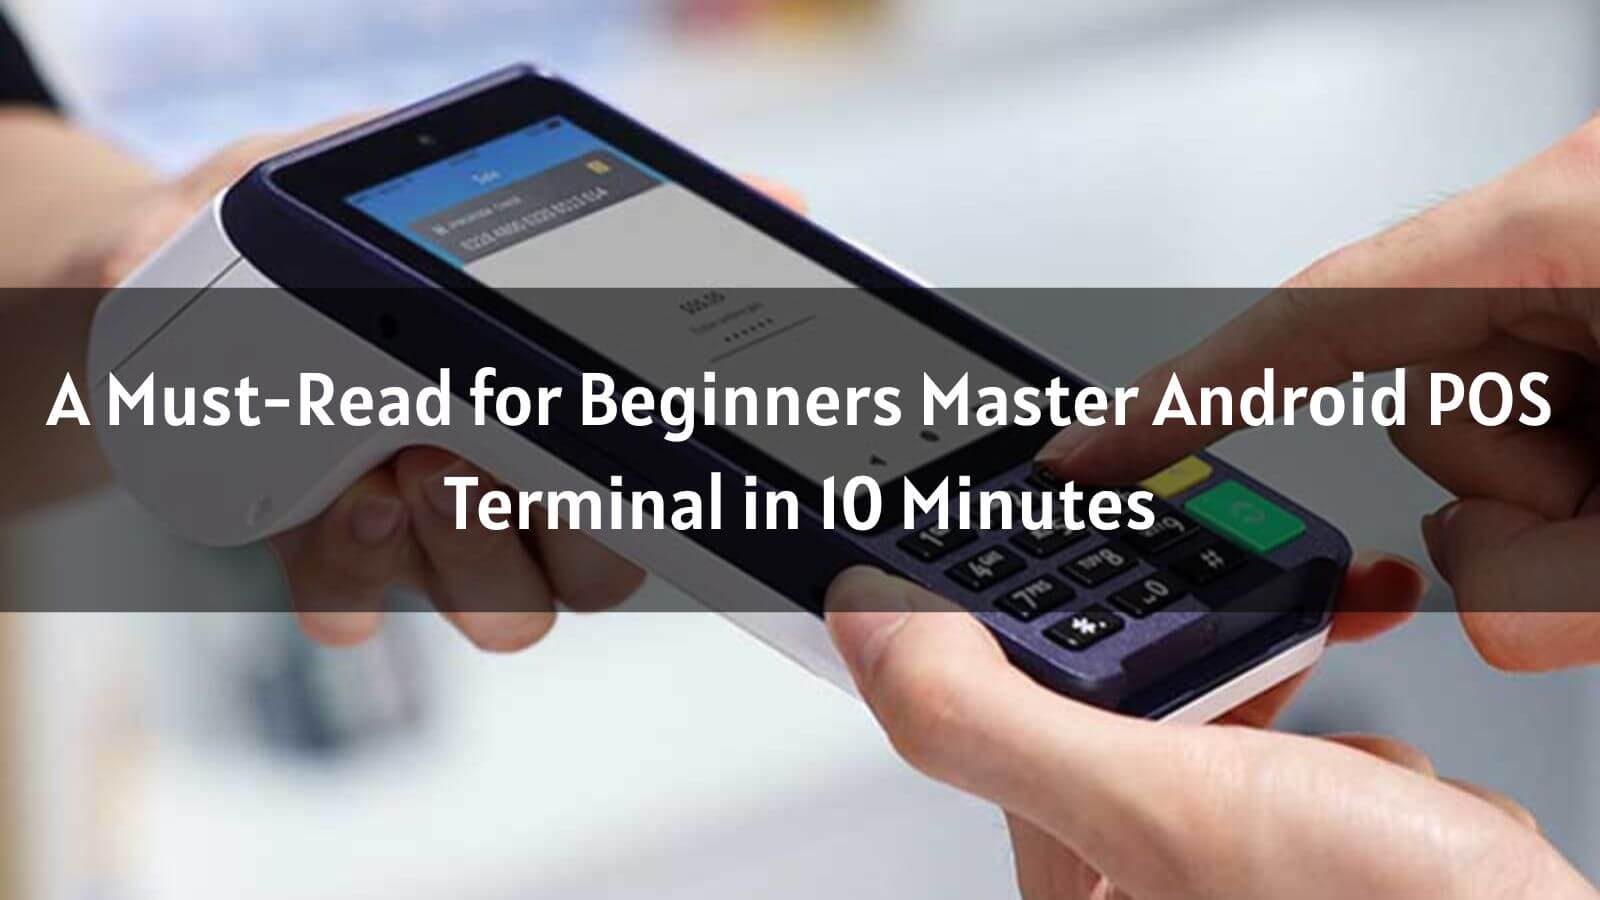
When you first unbox your Android POS terminal, it's like unwrapping a powerful business tool. Inside, you'll find the sleek terminal itself, a durable charging cable, a reliable power adapter, and optional accessories such as a precise stylus or a convenient mounting bracket. This isn't just any device; the Android POS System stands out with its highly intuitive navigation, making it accessible for both newcomers to the digital business world and seasoned professionals looking to enhance their operations.
One of its key advantages is portability. You can easily take it from your store's checkout counter to a pop - up event. Additionally, the customizable interfaces allow you to tailor it to your business's specific needs, whether that means adding your company logo or rearranging the layout for quicker access. It also offers seamless compatibility with a wide range of business apps, from inventory management tools to customer loyalty programs.
Usage Method:
Step 1: Connect the terminal to the power adapter and fully charge it before use. This ensures it's ready to go when you start setting it up.
Step 2: Press and hold the power button to turn it on. Then, follow the on - screen setup wizard. It will guide you through selecting your language, setting the time zone, and connecting to your network.
Step 3: If required by your business, register the device with your account. Make sure to enable all security protocols to protect your data and your customers' information.
To truly maximize the capabilities of your Android POS terminal, familiarize yourself with its hardware components. The main unit typically features a vibrant, responsive touchscreen display, perfect for navigating apps and processing transactions. There's also a built - in camera that can be used for barcode scanning or as a customer - facing display. Physical buttons provide quick access to essential functions, like powering on the device or triggering an emergency stop.
Many models come with a built - in thermal printer for instant receipt generation, while others have expandable ports to connect external devices such as cash drawers or additional monitors. Thanks to its lightweight design, moving the terminal around your store or taking it to different locations is a breeze.
Key Hardware Features:
Touchscreen Display: Highly responsive and durable, it enables smooth interaction with apps and transactions.
Connectivity Ports: USB, HDMI, or Ethernet ports allow for seamless integration with printers, cash drawers, and monitors.
Battery Life: Long - lasting batteries ensure your terminal can support a full day of business operations without frequent charging.
_1745311189_WNo_800d800.webp)
A stable connection is crucial for your Android POS terminal to function properly. It's the lifeline that enables real - time transaction processing and data syncing across your business ecosystem. The terminal supports multiple connectivity options: the reliable Wi-Fi, the versatile Bluetooth, and mobile data (if it has a SIM card slot).
Wi-Fi offers high - speed data transfer, making it ideal for indoor use in stores, offices, or restaurants with a fixed network. Bluetooth, on the other hand, simplifies the connection to essential peripherals like printers, cash drawers, or barcode scanners. Mobile data serves as a reliable backup for businesses on the move, such as food trucks or delivery services.
Usage Method:
1. Wi-Fi: Navigate to "Settings" > "Network & Internet" > "Wi-Fi." Toggle it on, select your network, and enter the password to connect.
2. Bluetooth: Enable Bluetooth in the settings. Put your peripheral in pairing mode, and then select it from the device list on the terminal.
3. Mobile Data: Insert the SIM card, go to "Mobile Network" settings, and configure the APN settings provided by your carrier.
Even with advanced technology, connectivity glitches can occur. Common problems include weak Wi-Fi signals, Bluetooth pairing failures, or issues activating mobile data. To maintain uninterrupted service, start by checking all physical connections. Ensure cables are plugged in securely and the SIM card is properly seated.
For wireless issues, a simple restart of the terminal and the connected device often resolves temporary bugs. If the problem persists, reach out to your service provider. They can help you verify network settings or troubleshoot carrier - specific issues.
Pro Tip:
Save multiple network profiles, such as a primary Wi-Fi profile and a backup mobile data profile. This way, the terminal can automatically switch during outages, keeping your business running smoothly.
_1745311265_WNo_800d800.webp)
The Android POS System is a powerful platform that offers endless possibilities. You can install apps from the Google Play Store or private app repositories, depending on your business needs. Whether you run a small boutique and need efficient payment processing tools, a large supermarket requiring advanced inventory management software, or a coffee shop looking to implement a customer loyalty app, this system provides seamless integration.
Regularly updating your apps is not just a good practice—it's essential. Updates bring the latest security patches, protecting your business and customer data from potential threats. They also introduce new features that can enhance your operations. Additionally, managing storage effectively helps maintain your terminal's optimal performance, preventing slowdowns and glitches.
Usage Method:
Step 1: Open the Play Store, search for the app you need (e.g., "POS payment software"), and tap "Install."
Step 2: For enterprise apps, enable "Unknown Sources" in the "Security" settings and install the APK files directly.
Step 3: To manage your apps, go to "Settings" > "Apps & Notifications." Here, you can force stop misbehaving apps, clear their data, or uninstall ones you no longer need.
A cluttered app layout can slow down your business operations. Grouping related apps into folders is a great way to improve efficiency. Create a "Payments" folder for your credit card processor and mobile wallet apps, or an "Inventory" folder for stock management and barcode scanning tools. Use descriptive labels and prioritize frequently used apps on the home screen. Some terminals even offer app locker features to prevent unauthorized access to sensitive programs.
Step-by-Step Organization:
Step 1: Long - press an app icon and drag it onto another icon to create a folder.
Step 2: Rename the folders by tapping the folder name and entering a custom label, like "Admin Tools" or "Customer Facing".
Step 3: Use the "App Drawer" search bar to quickly locate less - frequently used programs.
_1745311290_WNo_800d800.webp)
Your Android POS terminal isn't a standalone device; it's a central hub that can work in harmony with various hardware peripherals, significantly enhancing its functionality. Thermal printers are essential for providing customers with clear, professional - looking receipt copies. Barcode scanners streamline inventory management, speeding up the input process and reducing human error. Cash drawers offer a secure storage solution for cash transactions, safeguarding your earnings.
Most of these peripherals connect via Bluetooth or USB, featuring plug - and - play compatibility. This means that even those with limited technical knowledge can set them up with ease.
Usage Method:
1. Printers: Pair them via Bluetooth or connect using a USB OTG cable. Install the manufacturer's driver app to configure print settings, such as font size and receipt layout.
2. Scanners: Enable Bluetooth on both the scanner and the terminal. Put the scanner in pairing mode and select it from the terminal's device list. Test it by scanning a sample barcode.
3. Cash Drawers: Connect the drawer to the printer or terminal using an RJ11 cable. Then, configure the system so that the drawer opens automatically when a receipt is printed.
For businesses with specialized needs, advanced peripheral setup can unlock new capabilities. Integrating a customer display allows patrons to view their order total, loyalty points, or other relevant information in real - time. Scale integration is ideal for grocery stores or delis, enabling weight - based transactions. Magnetic stripe readers can still be useful for supporting older payment methods.
Always refer to the peripheral manufacturer's documentation for firmware updates. These often include compatibility improvements and new features that can further enhance your business operations.
Integration Checklist:
✅ Verify that the peripheral is compatible with your specific Android POS terminal model.
✅ Install any necessary drivers or bridge apps from the Play Store.
✅ Test the functionality with sample transactions before full deployment.
_1745311308_WNo_800d800.webp)
The home screen of your Android POS terminal is your command center, and it's fully customizable. You can prioritize the apps and functions you use most. Picture running a busy restaurant—you'd want quick access to the order - taking app, the kitchen display system, and the payment processing tool. With the ability to rearrange icons, create organized folders, and set up widgets, you can design a home screen that perfectly suits your workflow.
The intuitive UI is a significant advantage. It reduces the training time for your staff, allowing them to quickly get up to speed and use the terminal efficiently, ultimately boosting your business's productivity.
Usage Method:
Step 1: Long - press an app icon to drag and drop it to a new location or into a folder.
Step 2: To add widgets, long - press the home screen, select "Widgets," and choose your preferred tools, like a "Quick Settings" widget.
Step 3: Navigate between tasks using the navigation bar (back, home, recent apps) for efficient switching.
Personalizing the terminal's appearance does more than just make it look good—it reflects your brand and improves user satisfaction. Many Android POS systems allow you to apply custom themes, changing colors, fonts, and icon styles to match your business identity.
A retail store might opt for a vibrant theme with bold icons for easy navigation, while a luxury boutique could choose a sleek, minimalist design. Some launchers even support interactive widgets, such as a sales counter that updates in real - time on the home screen.
Theme Customization Steps:
Step 1: Download a custom launcher app from the Play Store, such as Nova Launcher or Action Launcher.
Step 2: Access the theme settings within the launcher to adjust colors, wallpapers, and icon packs.
Step 3: Save your custom theme and set it as the default home screen layout.
_1745311329_WNo_800d800.webp)
Processing transactions with your Android POS terminal is straightforward and efficient. Whether customers are paying by credit cards, mobile payments, or cash, the terminal has you covered. It supports the latest EMV chip cards, providing enhanced security against fraud. NFC payments, such as Apple Pay or Google Wallet, offer a convenient, contactless option that customers appreciate. For card - not - present transactions, you can easily enter the card details manually.
Each transaction is encrypted using state - of - the - art security protocols, ensuring the protection of both your business and your customers' sensitive information.
Usage Method:
Step 1: Open your payment processing app and select "New Transaction."
Step 2: Enter the amount, then choose the payment method: swipe/dip the card, scan a mobile wallet QR code, or enter the cash amount.
Step 3: Follow the screen prompts. If a customer signature is required, they can sign directly on the touchscreen. Then, print or email the receipt.
Transactions aren't always straightforward. Split payments (e.g., part cash, part credit card) and refunds require careful handling. Most Android POS systems support split payment functionality, enabling you to divide the total amount across multiple methods.
For refunds, locate the original transaction in your history, select "Refund," and follow the prompts to process the return—either to the original payment method or as store credit. Always keep detailed transaction records for accounting and dispute resolution purposes.
Best Practices:
1. Double - check amounts before finalizing split payments to avoid errors.
2. Train staff to verify customer ID for large refunds to prevent fraud.
3. Regularly reconcile refund records with your financial software for accurate accounting.
_1745311352_WNo_800d800.webp)
Your Android POS System offers advanced features that can take your business to the next level. Sales analytics provide valuable insights into your business performance. You can analyze daily sales figures, identify top - selling items, and understand customer trends. Inventory tracking helps you monitor stock levels, ensuring you never run out of popular products. Employee management features allow you to assign tasks, monitor performance, and manage schedules effectively.
Regular maintenance is equally important. Clearing the cache frees up storage space, updating the firmware brings the latest improvements, and checking for hardware issues early can prevent major problems down the line.
Usage Method:
1. Analytics: Access built - in reports or use third - party apps to view daily sales, top - selling items, and customer trends.
2. Maintenance: Go to "Settings" > "Storage" to clear the cache, and check "System Updates" for firmware upgrades.
If your business experiences high transaction volumes, proactive performance optimization is key. Close background apps regularly, especially during peak hours, to free up RAM. Disable unnecessary notifications to reduce distractions and battery drain.
For terminals used in harsh environments, like dusty warehouses or humid kitchens, consider using protective cases to extend the hardware's lifespan. Regularly back up data to the cloud or external storage to prevent loss during system resets.
Performance Checklist:
Restart the terminal nightly to clear temporary files.
Monitor storage usage monthly and delete obsolete data.
Use official chargers to avoid battery degradation.
In today's digital age, securing your Android POS terminal and controlling user access are of utmost importance. Data breaches can have severe consequences for your business. By creating different user profiles with varying permissions—separating admin rights from cashier privileges, for example—you can ensure that only authorized personnel access critical functions.
Enabling security features like PIN locks, fingerprint recognition, or remote device management adds an extra layer of protection. A PIN lock prevents unauthorized use, while fingerprint recognition offers quick and secure login. Remote device management allows you to wipe data or lock the terminal if it's lost or stolen, safeguarding your business and customer data.
Usage Method:
Step 1: In "Settings" > "Users & Accounts," add new users and assign roles. For example, restrict app installation for cashiers.
Step 2: Enable "Screen Lock" in the security settings, choosing between PIN, pattern, or biometric options.
To maintain customer trust and avoid penalties, ensure your Android POS terminal complies with global security standards like PCI - DSS for payment processing. This involves using encrypted data transmission, limiting access to sensitive information, and conducting regular security audits.
Many terminals come with built - in security features like tokenization, which replaces real card numbers with unique tokens, reducing the risk of data exposure.
Security Must-Haves:
1: Regularly update security patches and firmware.Open your payment processing app and select "New Transaction."
2: Use a VPN for secure data transmission over public networks.
3: Train staff on phishing awareness and password hygiene.
Make your Android POS terminal a true representation of your brand by customizing themes, labels, and workflows. A custom theme gives the terminal a unique look that aligns with your brand identity. Adding your business logo to receipts not only adds a professional touch but also serves as a branding opportunity.
Creating unique workflows for different departments in your business, such as the sales floor, warehouse, or customer service desk, can improve efficiency and streamline operations. These customizations enhance the user experience for both your staff and customers, reinforcing brand consistency.
Usage Method:
Step 1: Use launcher apps to change the home screen theme and icon pack.
Step 2: In your receipt settings, upload your logo and customize the text to include contact info or marketing messages.
Every business has its own unique processes, and your POS terminal should adapt to them. For a restaurant, create a workflow that focuses on table management and kitchen order routing. In a retail store, design a layout that speeds up product lookup and inventory adjustments.
Use automation tools to trigger actions, like opening cash drawers when a sale is completed or sending inventory alerts when stock levels are low.
Workflow Customization Example:
In a retail setting: Scan item → auto - populate price → apply discounts → process payment → print receipt.
In a restaurant: Select table → build order → send to kitchen → split check → process multiple payments.
Even the most reliable devices can encounter issues. Here’s how to troubleshoot common problems with your Android POS terminal: If the screen becomes unresponsive, a simple force restart by holding the power button for 10–15 seconds usually fixes the issue. Connectivity drops can be resolved by switching to a backup network (like mobile data) or restarting the router. App crashes, often caused by outdated versions or corrupted data, can be addressed by clearing the app cache, updating to the latest version, or reinstalling the app.
Troubleshooting Table:
|
Issue |
Solution |
|---|---|
|
Unresponsive screen |
Force restart: Hold power button for 10–15 seconds |
|
Connectivity drops |
Switch to backup network (e.g., mobile data), restart router |
|
App crashes |
Clear cache (Settings > Apps > [App] > Storage > Clear Cache) |
Preventive care is essential for extending your terminal's lifespan and reliability. Establish a regular maintenance routine that includes both software and hardware checks. Monthly tasks might involve updating all apps and firmware, while weekly tasks could include cleaning the screen and ports.
Keep a maintenance log to track issues and solutions. This helps you identify recurring problems and address them proactively.
Monthly Maintenance Checklist:
✅ Update all apps and the Android OS.
✅ Clear the system cache and delete unused files.
✅ Inspect the charging port for debris or damage.
✅ Test all peripherals (printers, scanners, cash drawers).
Mastering your Android POS terminal empowers your business with efficient transaction processing, seamless hardware integration, and customizable features. By following these steps, you’ll maximize the potential of your Android POS System, improving productivity and delivering a better customer experience.
Ready to streamline your business operations? Explore Jassway's range of high-quality Android POS terminals designed for reliability and performance. Visit our website today to find the perfect solution for your needs!
Q: Can I use my Android POS terminal without an internet connection?
A: Yes, some functions like offline transaction storage are available, but real-time data sync requires connectivity.
Q: How do I update the Android OS on my terminal?
A: Go to "Settings" > "System" > "Software Update" and follow the prompts to install the latest version.
Q: Are Android POS terminals secure for processing credit card payments?
A: Yes, they comply with PCI-DSS standards, using encryption and tokenization to protect sensitive data.
More Related Articles:
.png)